AD Setup [Legacy]
This page refers to the older LDAP integration and is only valid for v10 servers before 10.24.
Licensing
Using Active Directory integration requires a valid Support- and Upgrades agreement (SMSUP) for all licenses.
AD Setup
- If any setting or button referenced is missing after you enable AD, please refresh your browser window.
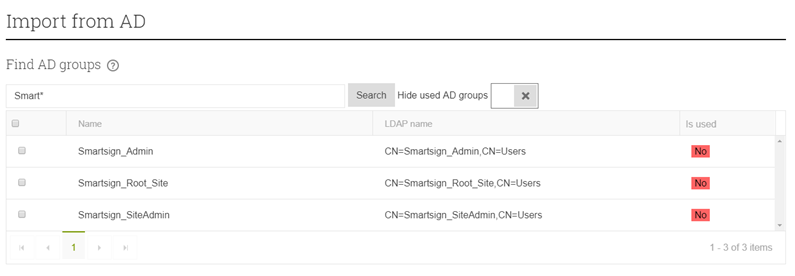
- The "LDAP path" also known as "Distinguished Name" is used to identify and link groups in AD to different objects in Smartsign. If you are not certain of the correct expression you can use the group import function as described in step 16b to find it for each group. Just copy and paste from there.
- Do not enable SSO until you have a working AD configuration. The automatic login makes troubleshooting much more difficult.
-
Decide how Smartsign should connect to your AD. Your options are to specify a username and password or use Windows integrated authentication. Using Windows integrated authentication means the connection will be established using the account that is configured to run the "Smartsign Server 10" service. If you decide on integrated, make sure that you have configured a suitable domain account to run the service before you proceed.
-
Open Smartsign Publisher in your web browser
-
Login using an Admin user
-
Go to Management -> System settings
-
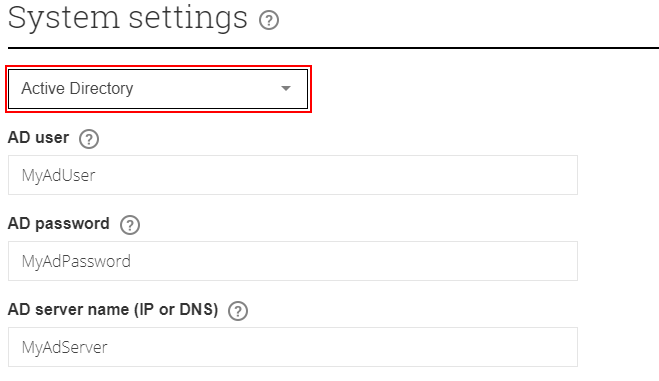
Select the Active Directory category from the drop-down

-
Start by checking the Enable AD setting to turn it on, then continue to configure it.
-
Configure the settings to match your AD environment, a detailed description of each settings is presented here.
Setting
Description
AD user
Username for AD connection (not used if you use integrated authentication)
AD password
Password for AD connection (not used if you use integrated authentication)
AD server name (IP or DNS)
IP or DNS address to the AD server (Domain controller) that you want to use
AD base DN
The base distinguished name. This will be appended to all LDAP paths that you input elsewhere.
Example: "DC=smartsign,DC=local"AD search base
The LDAP path to use when searching for groups to import. This setting is optional and can be left blank to search the entire directory starting at the AD base DN path configured above.
Example: "CN=Groups"
Sync groups from AD for users
Default: True
Update the user's groups from AD at login. Can be disabled if you manage access rights locally in Smartsign.
Recursive group search
Default: True
Resolve groups within groups when syncing the user's groups from AD. This may incur a performance penalty in large AD environments. If so, consider not using nested AD groups.
Use Windows integrated authentication for AD connection
Default: False
Use Windows integrated authentication instead of AD user and password above. See step 1 for a more detailed description.
Remove AD user from none-AD groups
Default: False
Remove AD users from local Smartsign groups (Enforce use of AD-groups for resource access rights)
Override normal users with same username
Default: True
Enable this to override already existing local users with the same username
Use AD user principal name as username in Smartsign
Default: True
Use the AD user principal name (UPN) as username in Smartsign. For example, "username@domain.com"
Use Sid for authentication
Default: True
Use the AD user's security identifier (SID) for the actual authentication. If disabled, the username will be used instead. Using the username is not recommended since it can change from the AD.
Port
Default: 389
Port to use for LDAP communication.
Use secure LDAP
Default: False
Use Secure LDAP (LDAP/S) for communication. This requires that you have SSL setup for you Active Directory. This should be False in most cases.
SSL Port (if using secure LDAP)
Default: 636
Port to use for secure LDAP communication if enabled.
Connection context options
Connection context for Secure LDAP, should normally be set to "Negotiate".
Other possible values are Negotiate, Sealing, ServerBind, Signing and SimpleBind.
Use comma to separate multiple.
-
Save the settings when you are done.
-
You should now have a working AD connection. You can use the group import function in step 16b to check that it's ok. We suggest you do so before proceeding with the next step.
-
If you have more than one site, first change to your root site or "all sites"
-
Go to Management -> Sites
-
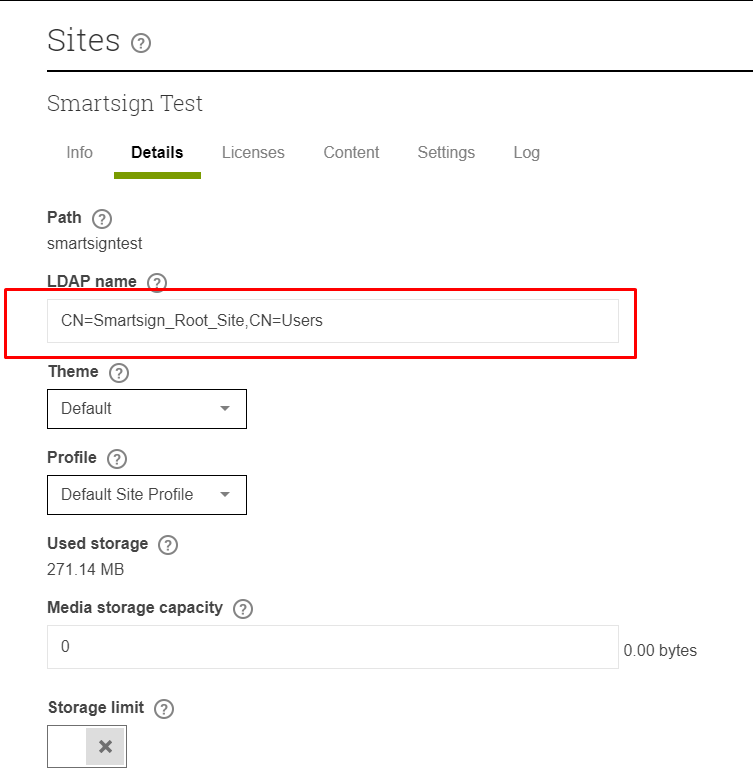
View each site where AD login should be possible and configure an AD group for it. Use the AD groups "LDAP path", also known as "Distinguished Name" to identify it.
The LDAP name setting will only be available after activating the AllowAD setting as instructed previously.
-
If you are in "All sites", change to the root site. (This is assuming that the user profiles for all other sites are synchronized from the root site.)
-
Go to Management -> User profiles
-
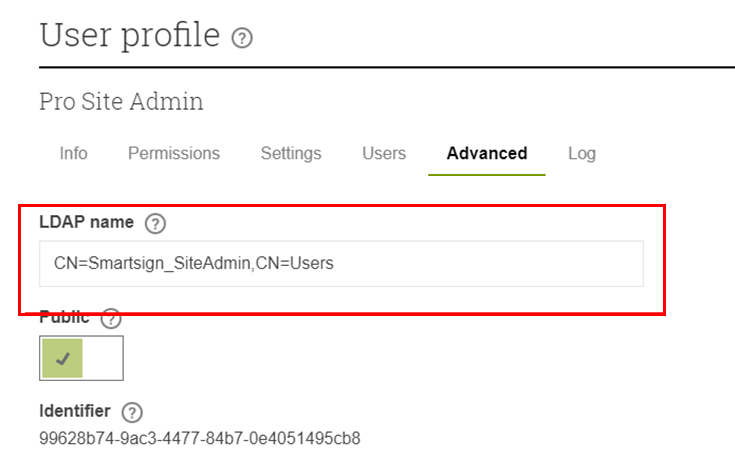
View each user profile that you want to use from AD and configure an AD group for it.

-
Any non-admin user will not be able to access any resources unless given explicit rights to do so. These rights can be assigned inside Smartsign if desired, but as a best practice we recommend using AD groups to control resource access too.
- If you have previously created groups in Smartsign you can link them to the AD groups by using the LDAP name setting on the detail tab (only available after activating the AllowAD setting).
- To simplify creating and linking new groups we have provided an
import function. Go to Management -> Groups and click "Import
AD groups". Using this function, you can search the AD for the
group that you want to add and then add it directly including
the LDAP name.

-
Once you have a working AD configuration you can enable Single-Sign-On (SSO) (optional). Go to system settings again and check EnableSSO. Then save and restart the Smartsign server service to activate it.
-
Done